Quickstart Guide
Running Visulate on a Virtual Machine.
Before you begin
- Identify an existing database that you want to publish or create an Oracle 23 Free database in GCP for testing. Note: the database may be visible from the public internet during this tutorial if you do not have a private connection to GCP (e.g via an Interconnect or VPN). A follow up activity will show you how to limit this visibility.
- Create a Visulate account in the database. Skip this step if you followed the Oracle 23 Free database instructions.
- Install Visulate from the Google Cloud Marketplace.
Post install setup
-
Wait for the VM to start and then use the Cloud Console or
gcloud compute sshto ssh into it. -
Create a
.bash_profilefile in your home directoryecho -e "# Source .bashrc if it exists\nif [ -f ~/.bashrc ]; then\n source ~/.bashrc\nfi" > ~/.bash_profile -
Create aliases for update-visulate, docker-compose and sqlplus
echo "source /home/visulate/alias.env" >> ~/.bashrc source ~/.bashrc -
Check for updates
 update-visulate

 latest: Pulling from docker/compose
 Digest: sha256:b60a020c0f68047b353a4a747f27f5e5ddb17116b7b018762edfb6f7a6439a82
 Status: Image is up to date for docker/compose:latest
 docker.io/docker/compose:latest
 2.0: Pulling from visulate-llc-public/visulate-for-oracle
 Digest: sha256:c09c621f9b5d419b8ec07d6ef4c6cd1003d40c9a7f035e8c4cf1d4ba5c4c135b
 Status: Image is up to date for gcr.io/visulate-llc-public/visulate-for-oracle:2.0
 gcr.io/visulate-llc-public/visulate-for-oracle:2.0
 2.0: Pulling from visulate-llc-public/visulate-for-oracle/ui
 Digest: sha256:32d073e0d67e1eca50756c940d720733cdd387e28da6a65ae445c751c9f9784e
 Status: Image is up to date for gcr.io/visulate-llc-public/visulate-for-oracle/ui:2.0
 gcr.io/visulate-llc-public/visulate-for-oracle/ui:2.0
 2.0: Pulling from visulate-llc-public/visulate-for-oracle/sql
 Digest: sha256:f4510ce604a17031cdd2e4e634ae89483e0c519753d10b392c0100ebb065ab4e
 Status: Image is up to date for gcr.io/visulate-llc-public/visulate-for-oracle/sql:2.0
 gcr.io/visulate-llc-public/visulate-for-oracle/sql:2.0
 2.0: Pulling from visulate-llc-public/visulate-for-oracle/proxy
 Digest: sha256:ddc6cbae74c01143d3ac22810ef0f1ca4a57165ad537edc0d3e2ae1258483616
 Status: Image is up to date for gcr.io/visulate-llc-public/visulate-for-oracle/proxy:2.0
 gcr.io/visulate-llc-public/visulate-for-oracle/proxy:2.0
Start Visulate
The Visulate code is delivered as a series of docker containers using a docker compose file located in the /home/visulate directory. Navigate to that directory and run docker-compose up -d to start the application.
cd /home/visulate
docker-compose up -d

Starting reverseproxy ... done
Starting visapi       ... done
Starting vissql       ... done
Starting visui        ... done
Wait a few minutes then verify all 4 containers are running:
docker ps
CONTAINER ID   IMAGE                                                      COMMAND                  CREATED          STATUS                        PORTS                               NAMES
6ccc9b701592   gcr.io/visulate-llc-public/visulate-for-oracle/ui:2.0      "/docker-entrypoint.…"   11 minutes ago   Up About a minute (healthy)   80/tcp                              visui
ed7e88fbb0a7   gcr.io/visulate-llc-public/visulate-for-oracle/sql:2.0     "/bin/sh -c 'gunicor…"   11 minutes ago   Up About a minute (healthy)   5000/tcp                            vissql
34492d16bd07   gcr.io/visulate-llc-public/visulate-for-oracle/proxy:2.0   "/docker-entrypoint.…"   11 minutes ago   Up About a minute             0.0.0.0:80->80/tcp, :::80->80/tcp   reverseproxy
899942a4618e   gcr.io/visulate-llc-public/visulate-for-oracle:2.0         "/bin/sh -c 'exec np…"   11 minutes ago   Up About a minute (healthy)   3000/tcp                            visapi
Open a firewall port to allow access on port 80
Use network tags or other mechanisms to open the VM for http traffic.
Verify the instance
Navigate to the public IP address of the Visulate VM in a browser window

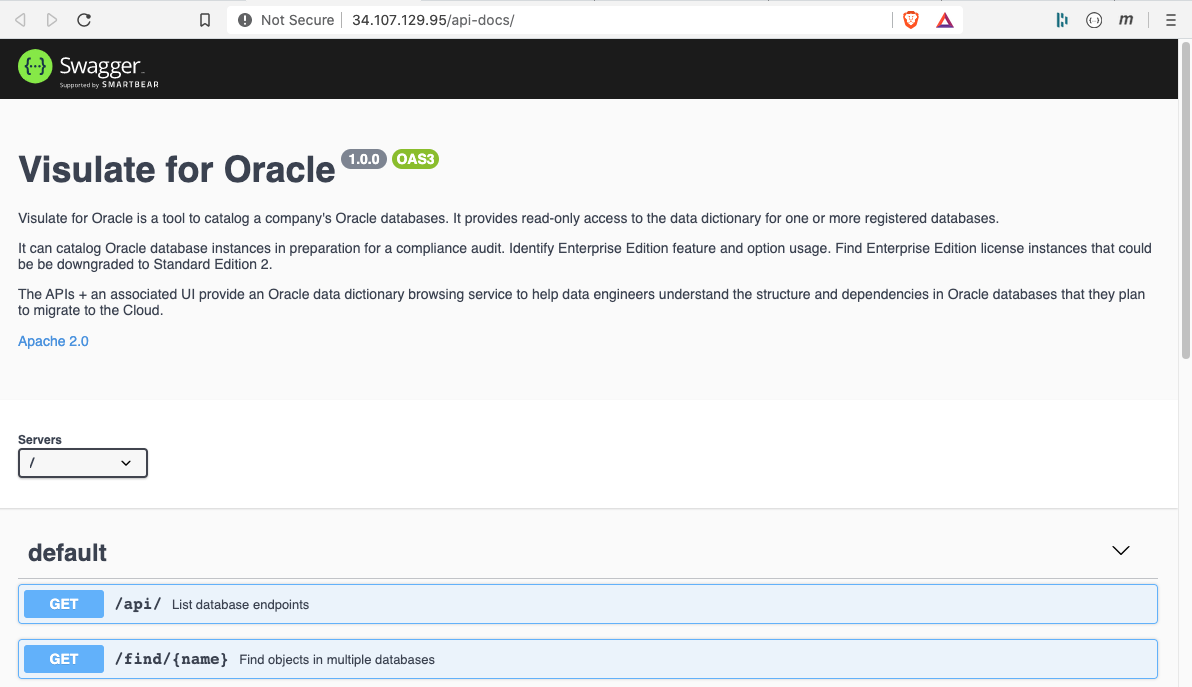
Edit the url changing “/database” to “/api/”. This should make a call to the API server. This calls the visulate API Server to request a summary of every registered database. We don’t have any at the moment so the call returns an empty list.

Change “/api/” to “/api-docs/” to review the API documentation.
Register a database
-
Login to the Visulate VM and use sqlplus to verify the connection to the test database you created earlier
 user@vm-visulate-20240811 /home/visulate $ sqlplus visulate@10.0.0.31:1521/freepdb1

 SQL*Plus: Release 19.0.0.0.0 - Production on Sun Aug 11 20:19:17 2024
 Version 19.23.0.0.0

 Copyright (c) 1982, 2023, Oracle.  All rights reserved.

 Enter password:
 Last Successful login time: Sun Aug 11 2024 20:18:47 +00:00

 Connected to:
 Oracle Database 23ai Free Release 23.0.0.0.0 - Develop, Learn, and Run for Free
 Version 23.4.0.24.05

 SQL> exit
 Disconnected from Oracle Database 23ai Free Release 23.0.0.0.0 - Develop, Learn, and Run for Free
 Version 23.4.0.24.05
Note: this command runs sqlplus from the same container that Visulate uses for database connections. Investigate and resolve any connection issues before continuing.
-
Stop Visulate
docker-compose down Stopping visulate_visui_1 ... done Stopping visulate_vissql_1 ... done Stopping visulate_visapi_1 ... done Stopping visulate_reverseproxy_1 ... done Removing visulate_visui_1 ... done Removing visulate_vissql_1 ... done Removing visulate_visapi_1 ... done Removing visulate_reverseproxy_1 ... done Removing network visulate_default -
Create database registration entries
-
Edit
database.jsfile in the/home/visulate/configdirectory with the connect detailssudo vi config/database.js const endpoints = [ { namespace: 'testdb', description: 'Example endpoint', connect: { poolAlias: 'testdb', user: 'visulate', password: 'vis1066r', connectString: 'oratest.us-east1-b.c.visulate-llc-dev.internal:1521/free23pdb1', poolMin: 4, poolMax: 4, poolIncrement: 0 } } ]; module.exports.endpoints = endpoints; -
Edit
endpoints.jsonin the/home/visulate/configdirectory to enable query access for a database. Note: the json key must match an endpoint declared in the database.js file and the json value must match its connectString.sudo vi config/endpoints.json {"testdb":"oratest.us-east1-b.c.visulate-llc-dev.internal:1521/free23pdb1"} -
Restart Visulate
docker-compose up -d
Review your database and its data model
Open the Visulate UI. Try re-running the /api/ call you made earlier. It should return a schema object summary for your database. Click on the Database dropdown list. You should see an entry called “testdb”. Select the value and wait for the database report to run (may take a couple of seconds). The results will appear below the selection form. Scroll down the page to review.
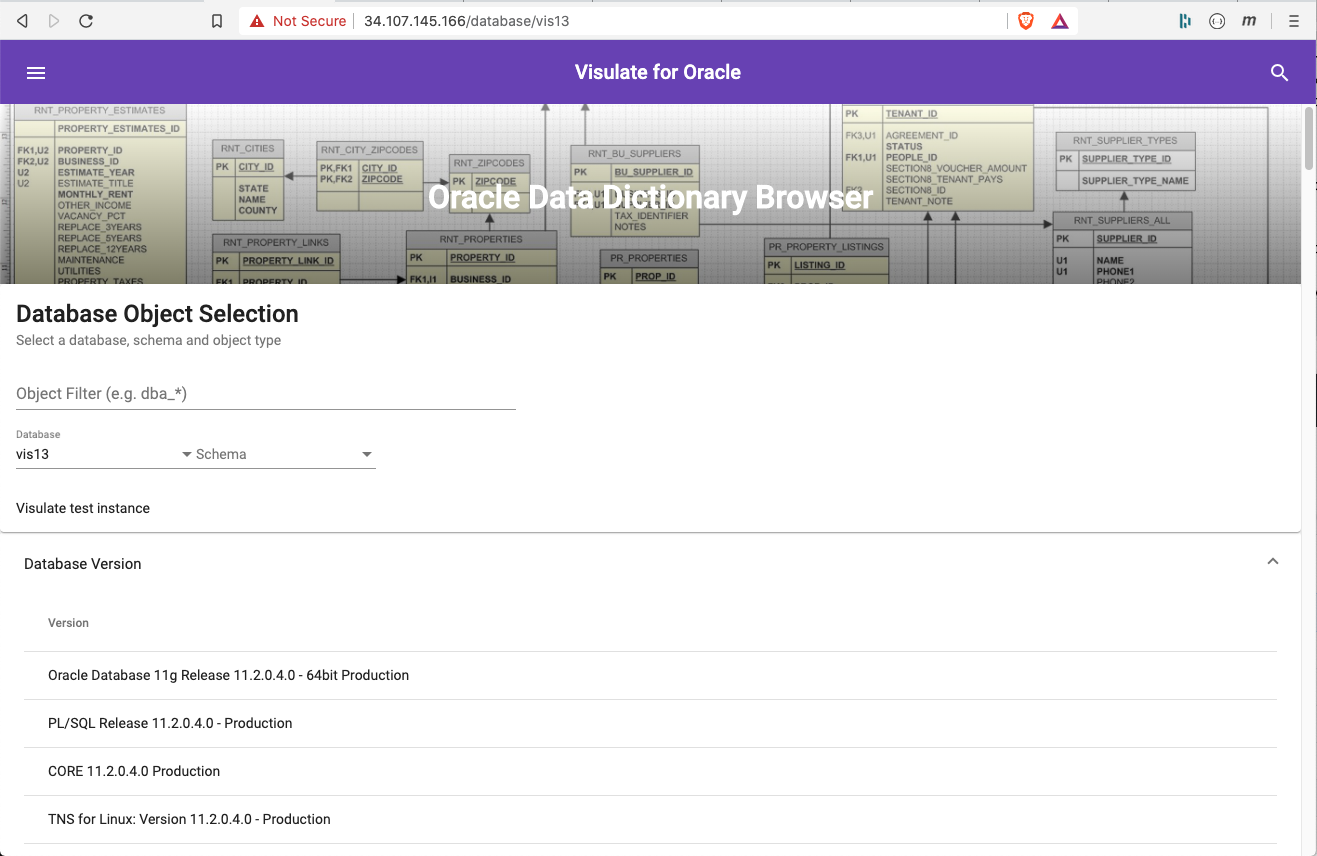
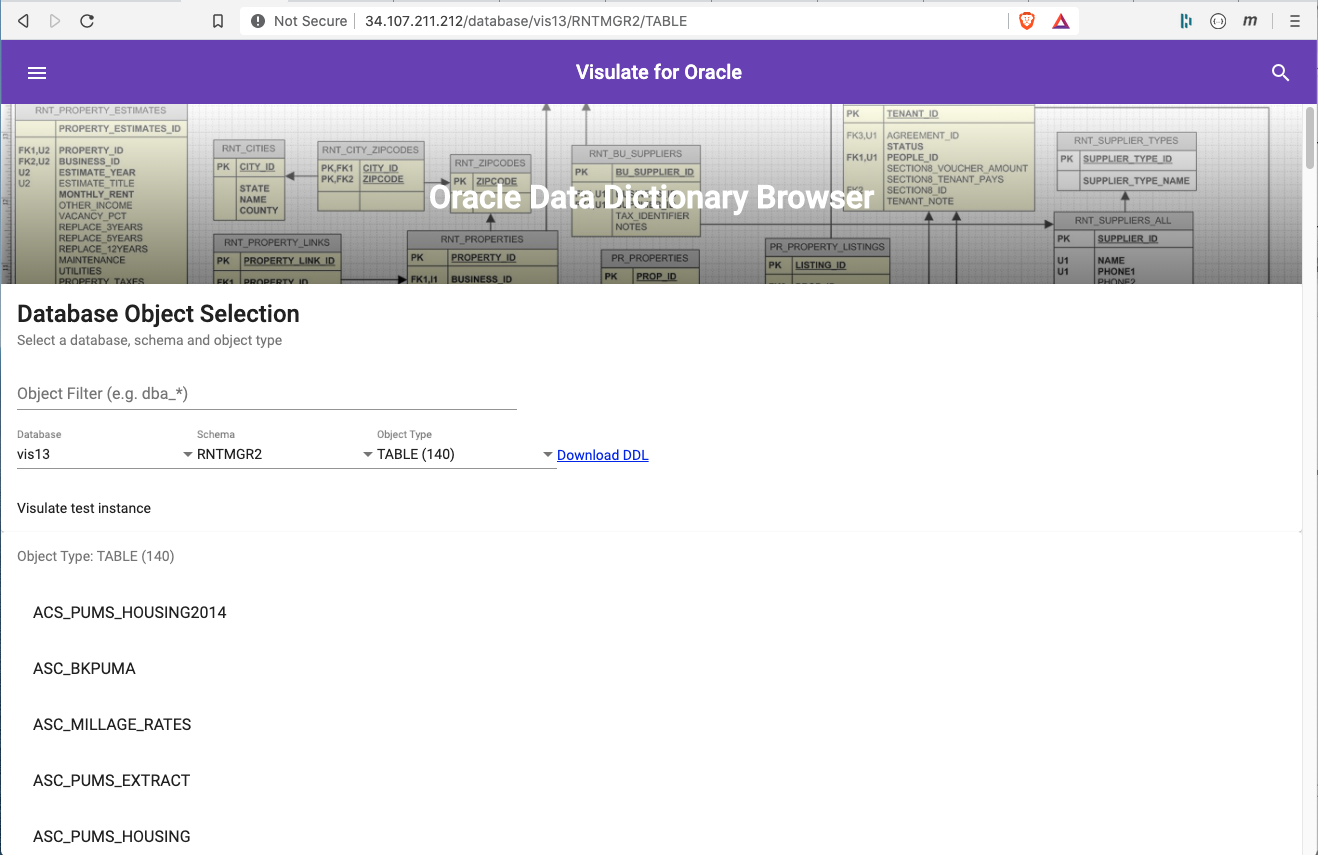
Select a database user from the Schema drop down. Notice the database report is replaced by a schema one. Now select “TABLE” from the Object Type field to see a list of tables in the schema.
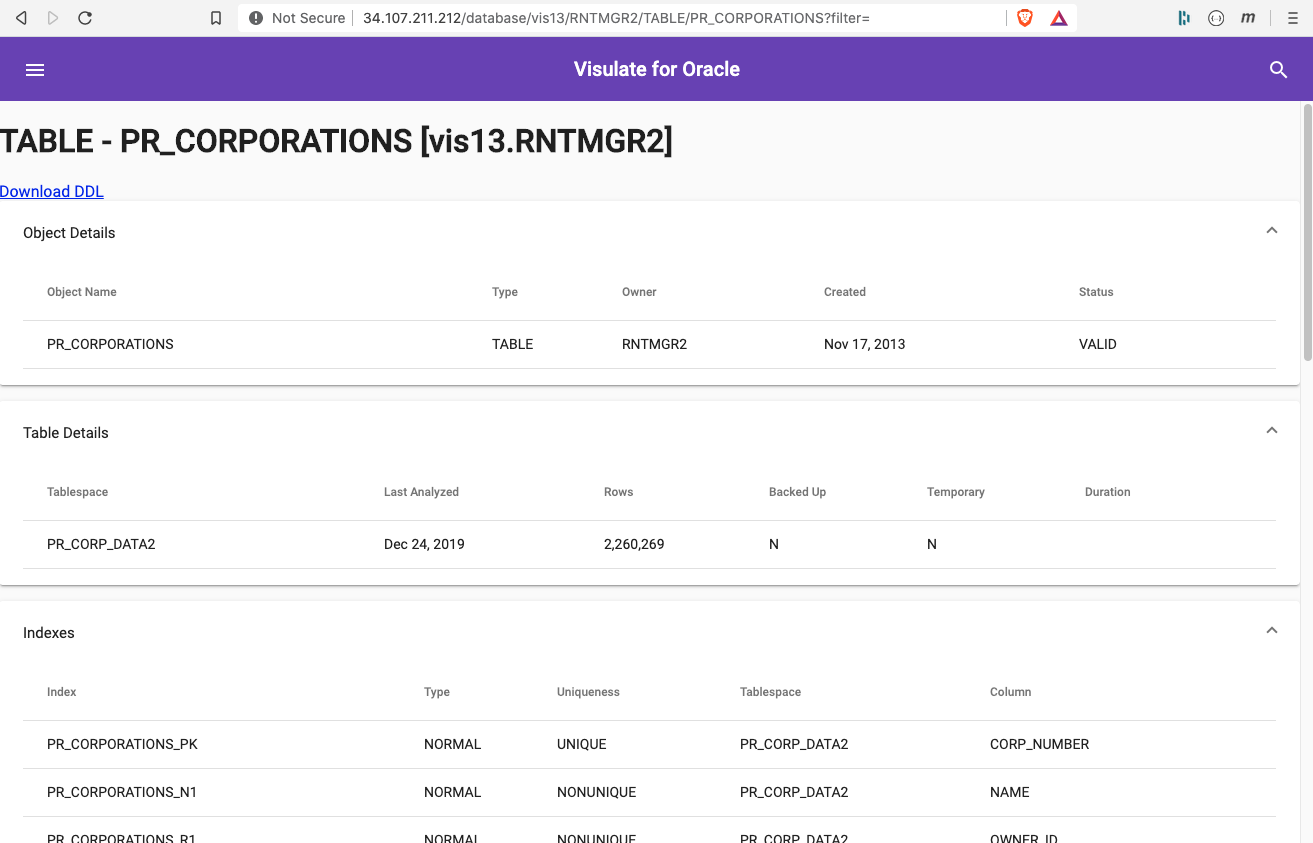
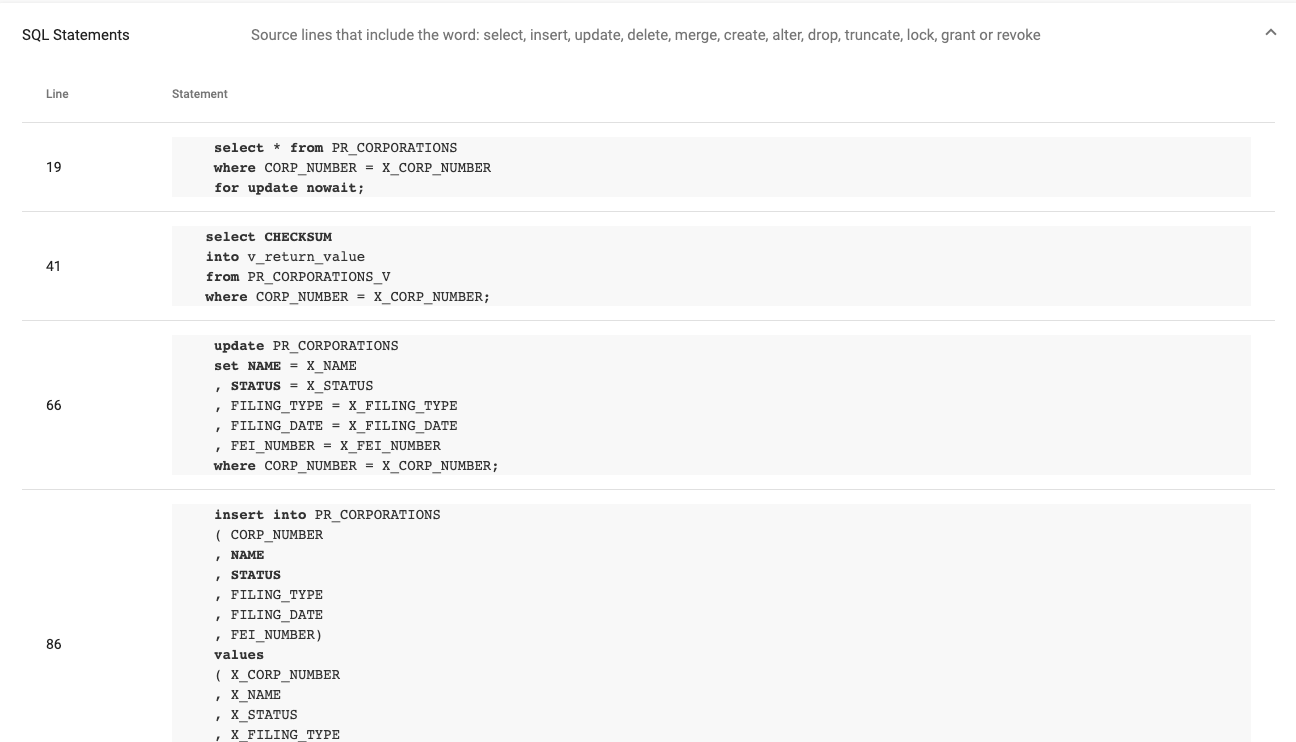
Click on one of the tables to open the table report. This report shows table details like its tablespace, number of rows, indexes, constraints, foreign keys and columns. A Download DDL link at the top of the page can be used to generate the data definition language SQL for the table.
Scroll to the bottom of the page to see a list of objects (e.g. packages, package bodies and views) that reference the table.
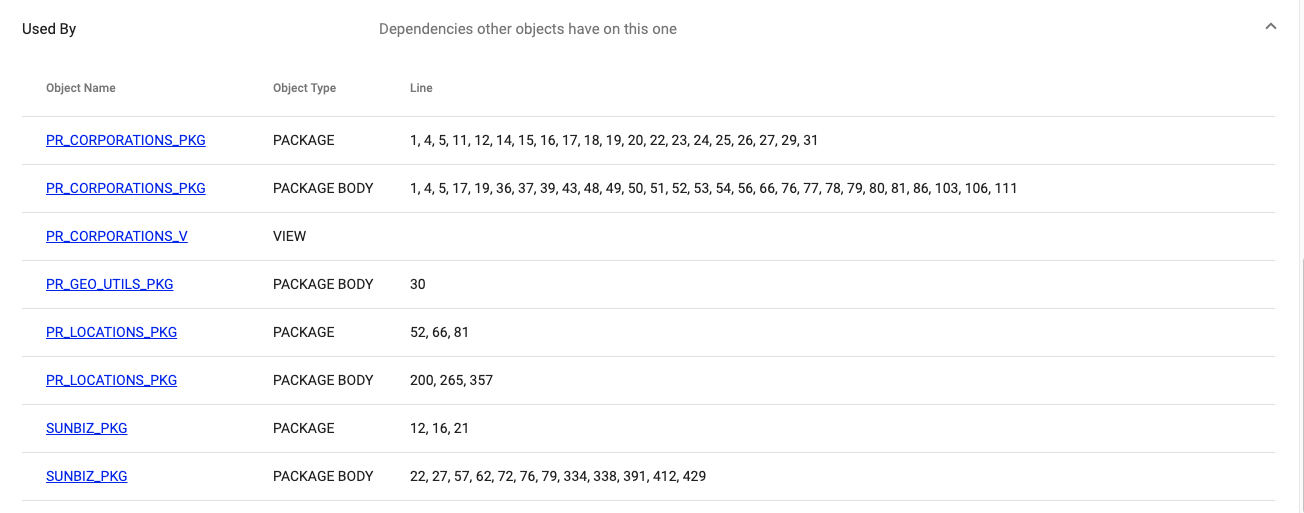
Clicking on an object name in the dependency list will take you to a report showing its definition. For example, selecting a package body will open a report that shows the source code for the package body and a list of the SQL statement it contains.
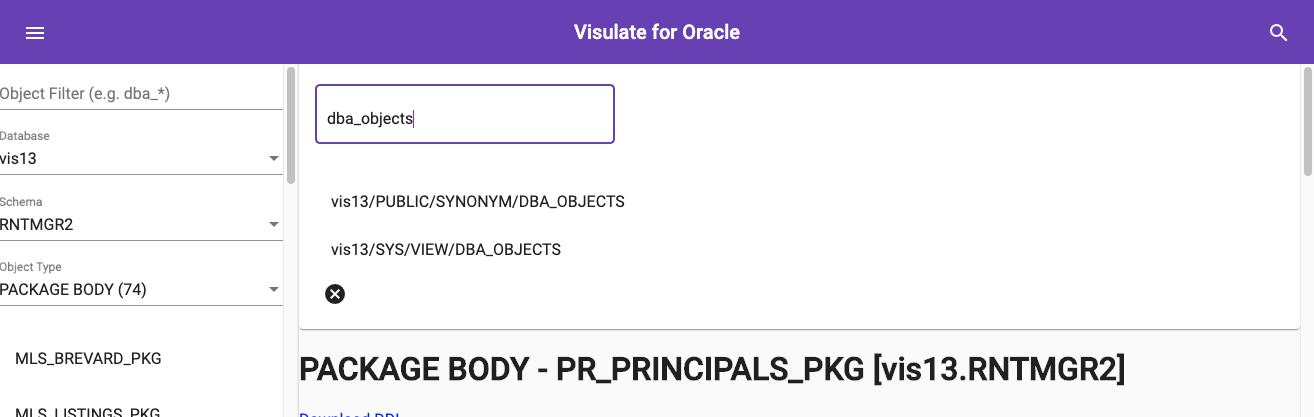
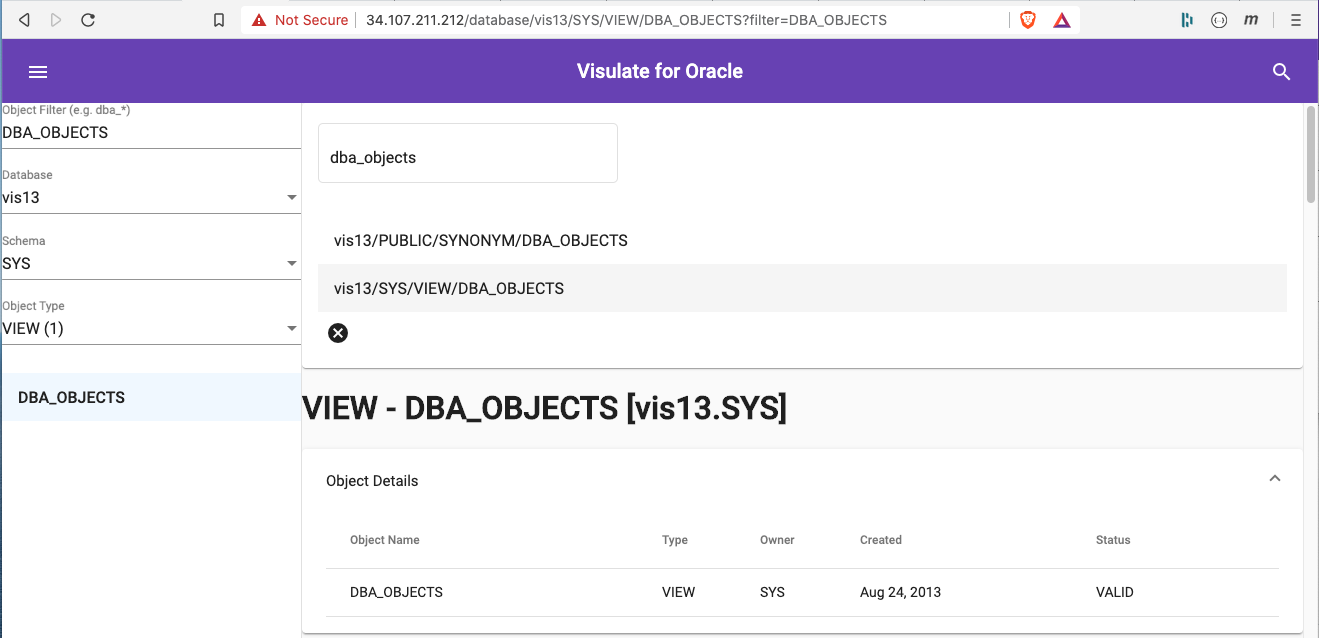
Click on the search icon at the top (right) of the page to access the search form. Enter dba_objects in the search box and press return. This queries every registered database to find objects with a matching object_name (in our case we only have one registered database).
Click on one of the results to see its definition report.
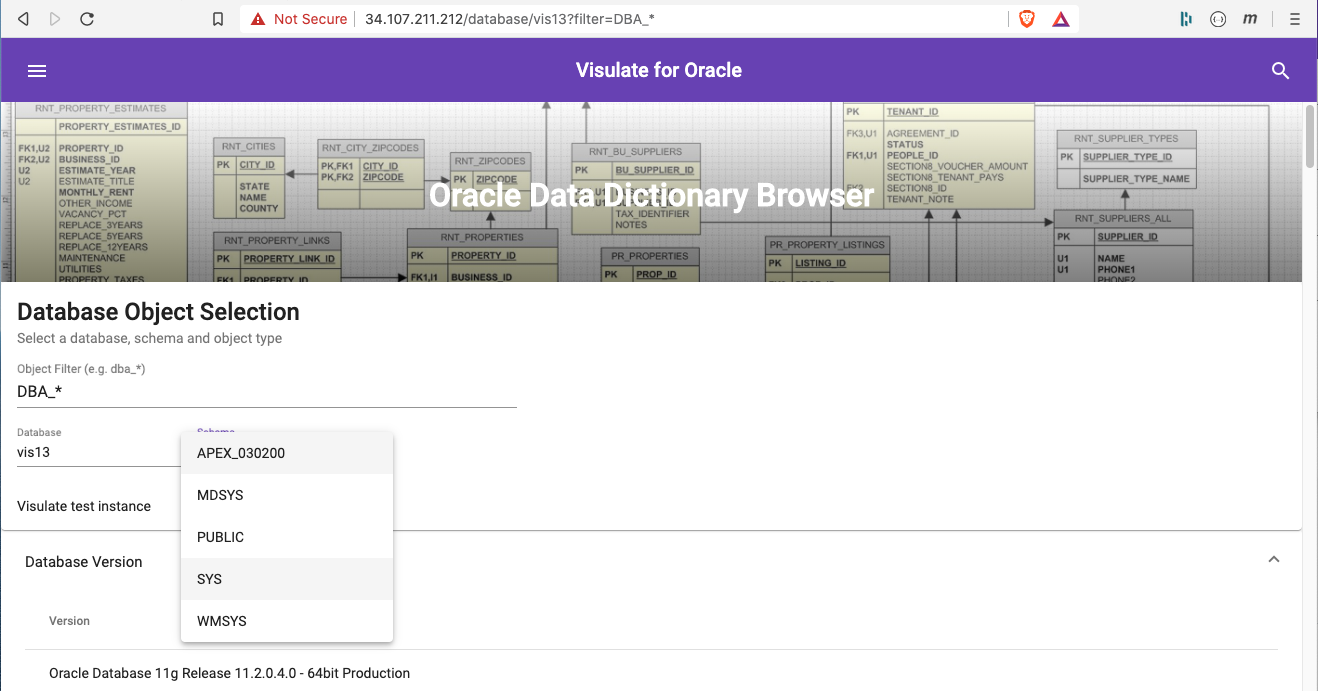
Click on the “Visulate” title at the top (center) of the screen to return to the homepage. Notice the Object Filter field has been populated with DBA_OBJECTS (the last search condition). Change this value to DBA_* and then select a database and schema. Notice the navigation lists are now filtered using this wildcard.
Generate a CSV file
Open the Visulate UI and navigate to a database table. A query editor region is included at the top of the page. It contains an HTML form with username, password, sql query, bind variables and query option fields. Most of the fields are populated with default values.
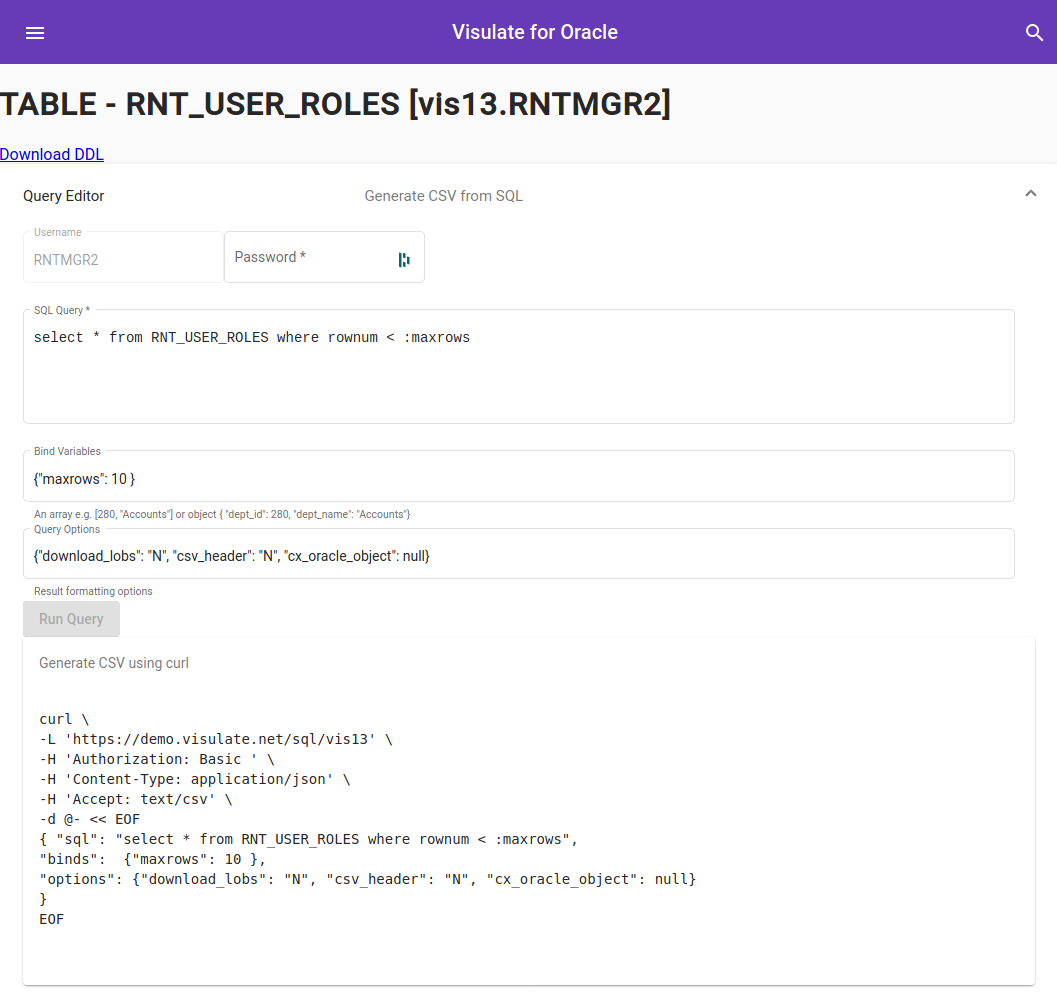
Enter the database password for the schema where the table resides to enable the Run Query button. Note: database credentials are passed to the SQL Query Engine using a basic auth header. Make sure you are using a secure (https) connection before submitting the query (you may need to accept some browser warnings). Run the query and review the results.
A curl command appears below the results. Cut and paste this into a console window to execute the REST API call outside of the UI. Note you may need to pass -k or --insecure option if you haven’t setup a TLS certificate
Enable Google Gemini AI
-
Register an API key in Google AI Studio
-
Create an
.envfile in the/home/visulatedirectory and add your key. This ensures the key is available to all services (API Server and AI Agents).echo "GOOGLE_AI_KEY=your-google-api-key" | sudo tee /home/visulate/.env -
Restart Visulate
docker-compose down docker-compose up -d -
Navigate to a database table screen and start asking questions
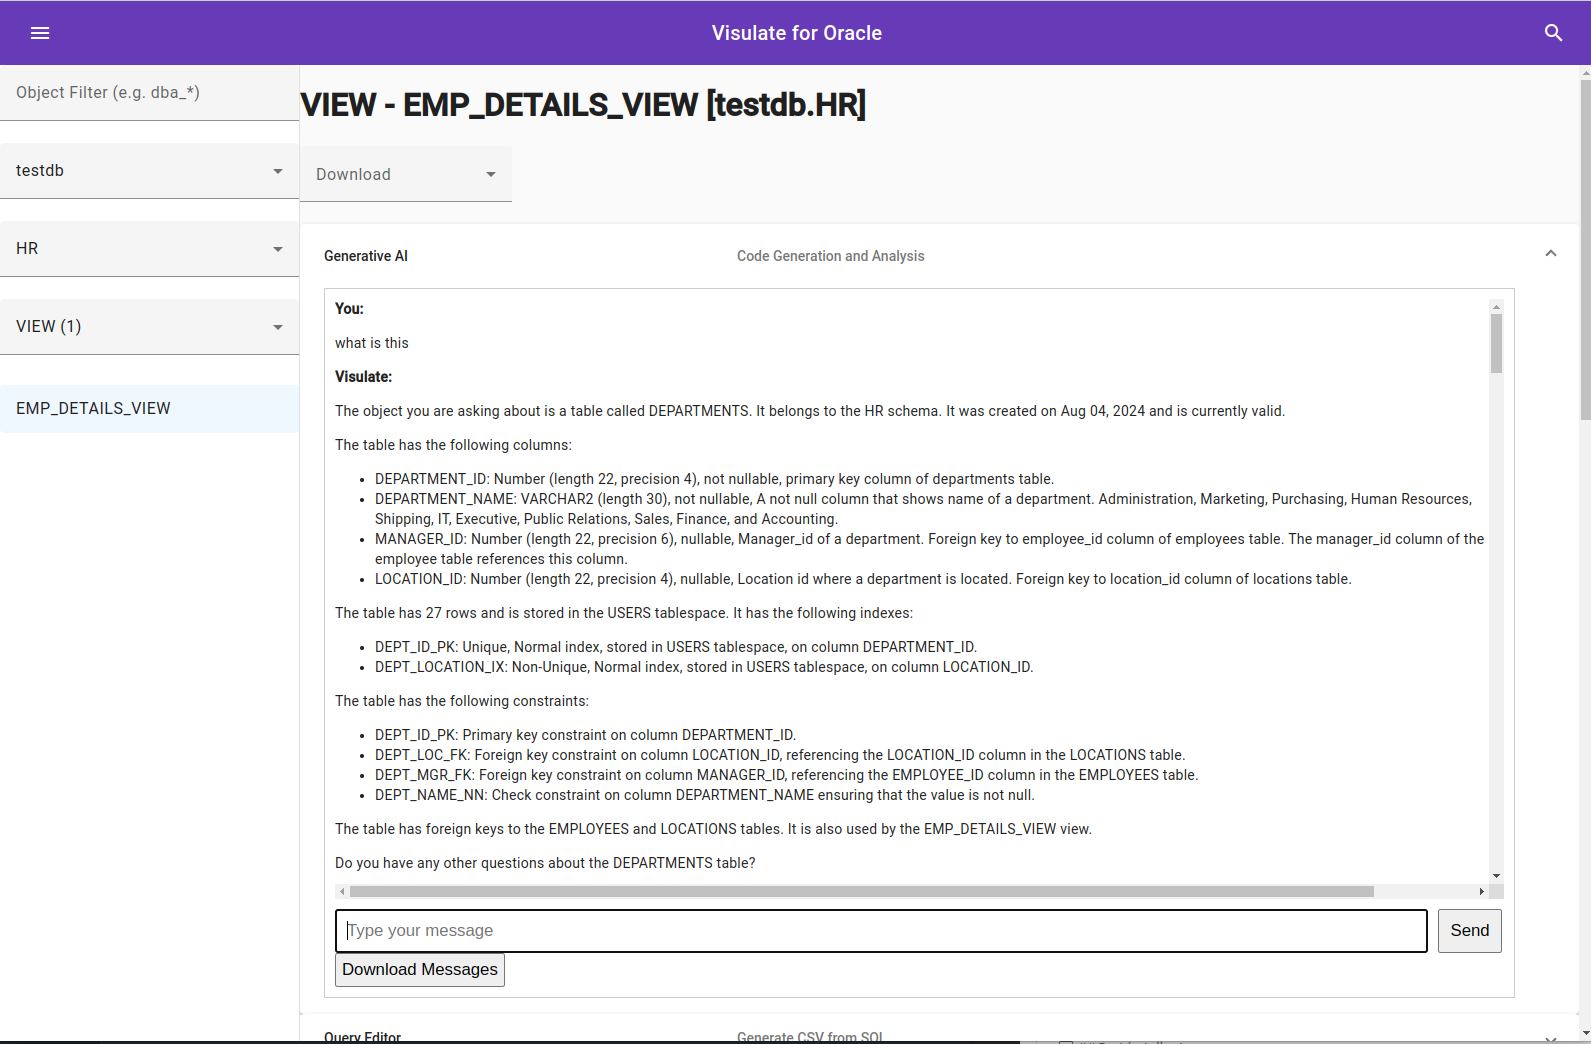
Click the expand icon at the top right of the chat window to expand to full screen

Next Steps
- Configure Network Security and IAP to control access and protect your instance
- Register additional databases to expand your AI-powered catalog
- Delete the VM when you’re done with the tutorial to avoid incurring further charges.
- If you created an Oracle 23 Free VM, remember to delete it as well.
Copyright © Visulate LLC, 2019, 2025 Privacy Policy