- Visulate Installation
Visulate Installation
Architecture
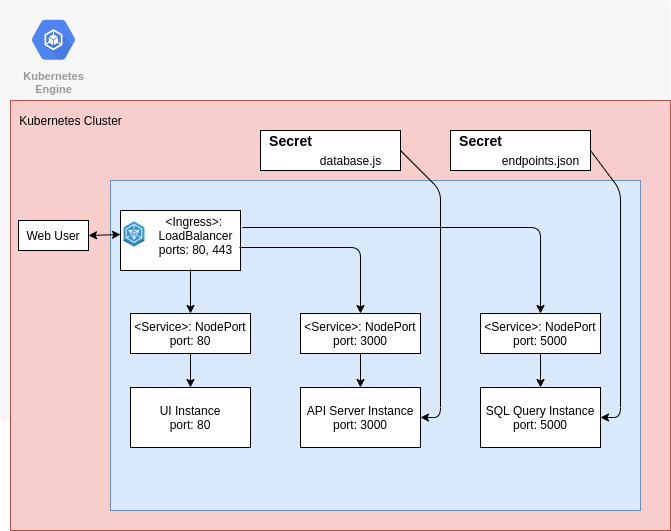
Visulate comprises UI, API and SQL deployments exposed to an ingress via NodePorts. Web users connect to the application via the Ingress resource. Http path rules in the ingress spec route requests to the UI, API or SQL Service as required.
Database and SQL endpoint registration is performed using Secrets. The Secret manifest delivers the database.js configuration file that the API server reads during initialization as part of the API Server deployment. A separate manifest delivers the endpoints.json manifest for the SQL Query Engine.
Quick install with Google Cloud Marketplace
Get up and running with a few clicks! Install the Visulate app to a Google Kubernetes Engine cluster using Google Cloud Marketplace. Follow the on-screen instructions and the quickstart guide
Command line instructions
Prerequisites
Set up command-line tools
You’ll need the following tools in your development environment.
Configure gcloud as a Docker credential helper:
gcloud auth configure-docker
Create a Google Kubernetes Engine cluster
Create a new cluster from the command line:
export CLUSTER=visulate-cluster
export ZONE=us-east4-a

gcloud container clusters create "$CLUSTER" --zone "$ZONE"
Configure kubectl to connect to the new cluster.
gcloud container clusters get-credentials "$CLUSTER" --zone "$ZONE"
Note: Visulate required GKE version 1.16 or later.
Clone this repo
Clone this repo and the associated tools repo:
git clone --recursive https://github.com/visulate/visulate-for-oracle.git
Install the Application resource definition
An Application resource is a collection of individual Kubernetes components, such as Services, Deployments, and so on, that you can manage as a group.
To set up your cluster to understand Application resources, run the following command:
kubectl apply -f \
"https://raw.githubusercontent.com/GoogleCloudPlatform/marketplace-k8s-app-tools/master/crd/app-crd.yaml"
You only need to run this command once.
The Application resource is defined by the Kubernetes SIG-apps community. The source code can be found on github.com/kubernetes-sigs/application.
Generate and apply a license key
Open the Visulate configuration screen and click on the Deploy via command line link.
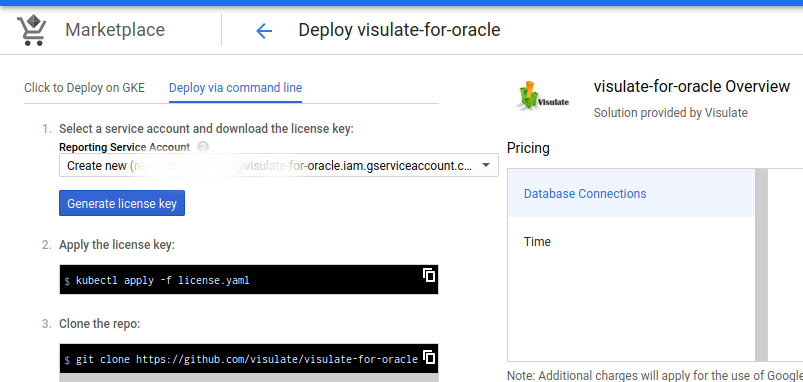
Select a Reporting Service Account and then press the Generate license key button. Save the file and then apply it using kubectl:
kubectl apply -f license.yaml
Read the reporting secret name and set an environment variable for it
kubectl get secret
NAME                          TYPE                                  DATA   AGE
default-token-pph2p           kubernetes.io/service-account-token   3      27m
visulate-for-oracle-license   Opaque                                3      37s

export REPORTING_SECRET=visulate-for-oracle-license
Install the Application
Navigate to the google-marketplace directory
cd google-marketplace
Configure the app with environment variables
Choose an instance name and
namespace
for the app. In most cases, you can use the default namespace.
export APP_INSTANCE_NAME=visulate-1
export NAMESPACE=default
Specify the number of replicas for the UI and API server pods:
export UI_REPLICAS=1
export API_REPLICAS=1
export SQL_REPLICAS=1
Specify a cross origin whitelist. This is a comma separated list of UI origin servers that are allowed to make API calls. Example: ‘https://mydomain.com, https://mydomain.net:445, http://35.45.9.55:8080’. Enter * to allow requests from any origin. Most deployments can leave this blank to prevent cross origin requests. It’s only needed if you plan to implement your own UI or host the Visulate UI from a different origin to the API server:
export CROSS_ORIGIN_WHITELIST=''
Specify a timeout value in seconds for the SQL Query Engine
export SQL_TIMEOUT=300
Set up the image tag:
It is advised to use stable image reference which you can find on Marketplace Container Registry. Example:
export TAG="1.1"
Configure the container images:
export IMAGE_VISULATE="marketplace.gcr.io/visulate-llc-public/visulate-for-oracle"
export IMAGE_VISULATE_UI="marketplace.gcr.io/visulate-llc-public/visulate-for-oracle/ui"
export IMAGE_VISULATE_SQL="marketplace.gcr.io/visulate-llc-public/visulate-for-oracle/sql"
export IMAGE_VISULATE_UTIL="marketplace.gcr.io/visulate-llc-public/visulate-for-oracle/util"
export IMAGE_VISULATE_UBBAGENT="marketplace.gcr.io/visulate-llc-public/visulate-for-oracle/ubbagent"
Create TLS certificate for Visulate
-
If you already have a certificate that you want to use, copy your certificate and key pair to the
/tmp/tls.crt, and/tmp/tls.keyfiles, then skip to the next step.To create a new certificate, run the following command:
openssl req -x509 -nodes -days 365 -newkey rsa:2048 \ -keyout /tmp/tls.key \ -out /tmp/tls.crt \ -subj "/CN=visulate/O=visulate" -
Set
TLS_CERTIFICATE_KEYandTLS_CERTIFICATE_CRTvariables:export TLS_CERTIFICATE_KEY="$(cat /tmp/tls.key | base64)" export TLS_CERTIFICATE_CRT="$(cat /tmp/tls.crt | base64)"
Expand the manifest template
Use helm template to expand the template. We recommend that you save the
expanded manifest file for future updates to the application.
helm v2 syntax:
helm template chart/visulate-for-oracle \
  --name "$APP_INSTANCE_NAME" \
  --namespace "$NAMESPACE" \
  --set apiServer.image.repo="$IMAGE_VISULATE" \
  --set apiServer.image.tag="$TAG" \
  --set apiServer.replicas="$API_REPLICAS" \
  --set apiServer.corsOriginWhitelist="$CROSS_ORIGIN_WHITELIST" \
  --set ui.image.repo="$IMAGE_VISULATE_UI" \
  --set ui.image.tag="$TAG" \
  --set ui.replicas="$UI_REPLICAS" \
  --set sql.image.repo="$IMAGE_VISULATE_SQL" \
  --set sql.image.tag="$TAG" \
  --set sql.replicas="$SQL_REPLICAS" \
  --set sql.timeout="$SQL_TIMEOUT" \
  --set util.image="$IMAGE_VISULATE_UTIL:$TAG" \
  --set ubbagent.image="$IMAGE_VISULATE_UBBAGENT:$TAG" \
  --set reportingSecret="$REPORTING_SECRET" \
  --set tls.base64EncodedPrivateKey="$TLS_CERTIFICATE_KEY" \
  --set tls.base64EncodedCertificate="$TLS_CERTIFICATE_CRT" \
  > "${APP_INSTANCE_NAME}_manifest.yaml"
helm v3:
helm template $APP_INSTANCE_NAME chart/visulate-for-oracle \
  --namespace "$NAMESPACE" \
  --set apiServer.image.repo="$IMAGE_VISULATE" \
  --set apiServer.image.tag="$TAG" \
  --set apiServer.replicas="$API_REPLICAS" \
  --set apiServer.corsOriginWhitelist="$CROSS_ORIGIN_WHITELIST" \
  --set ui.image.repo="$IMAGE_VISULATE_UI" \
  --set ui.image.tag="$TAG" \
  --set ui.replicas="$UI_REPLICAS" \
  --set sql.image.repo="$IMAGE_VISULATE_SQL" \
  --set sql.image.tag="$TAG" \
  --set sql.replicas="$SQL_REPLICAS" \
  --set sql.timeout="$SQL_TIMEOUT" \
  --set util.image="$IMAGE_VISULATE_UTIL:$TAG" \
  --set ubbagent.image="$IMAGE_VISULATE_UBBAGENT:$TAG" \
  --set reportingSecret="$REPORTING_SECRET" \
  --set tls.base64EncodedPrivateKey="$TLS_CERTIFICATE_KEY" \
  --set tls.base64EncodedCertificate="$TLS_CERTIFICATE_CRT" \
  > "${APP_INSTANCE_NAME}_manifest.yaml"
Apply the manifest to your Kubernetes cluster
Use kubectl to apply the manifest to your Kubernetes cluster:
kubectl apply -f "${APP_INSTANCE_NAME}_manifest.yaml" --namespace "${NAMESPACE}"
View the app in the Google Cloud Console
To get the GCP Console URL for your app, run the following command:
echo "https://console.cloud.google.com/kubernetes/application/${ZONE}/${CLUSTER}/${NAMESPACE}/${APP_INSTANCE_NAME}"
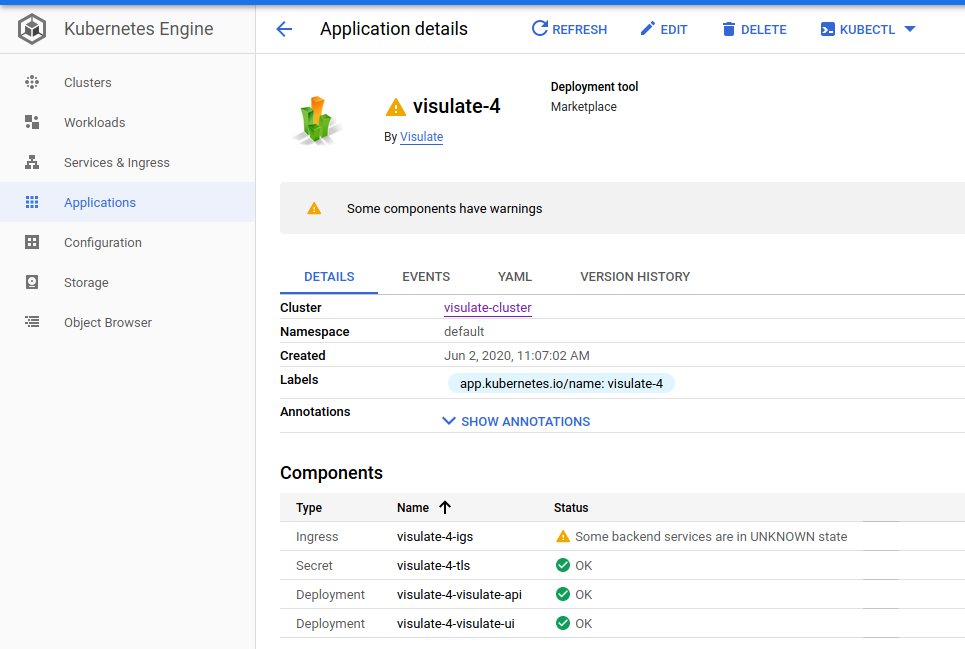
Open the link in a browser to follow progress. Note it may take more than 10 minutes for the instance to deploy. During this time you may see a “Some backend services are in UNKNOWN state” warning (see example below). This is normal.
Click on the Ingress link or use use kubectl to monitor progress of this step:
kubectl describe ingress visulate-4-igs
Name:             visulate-4-igs
Namespace:        default
Address:          34.120.178.240
Default backend:  visulate-4-visulate-ui-svc:80 (10.40.0.10:80,10.40.0.11:80)
TLS:
  visulate-4-tls terminates
Rules:
  Host        Path  Backends
  ----        ----  --------
  *
              /*            visulate-4-visulate-ui-svc:80 (10.40.0.10:80,10.40.0.11:80)
              /api/*        visulate-4-visulate-api-svc:3000 (10.40.1.5:3000,10.40.2.8:3000)
              /api-docs/*   visulate-4-visulate-api-svc:3000 (10.40.1.5:3000,10.40.2.8:3000)
              /find/*       visulate-4-visulate-api-svc:3000 (10.40.1.5:3000,10.40.2.8:3000)
              /ddl/*        visulate-4-visulate-api-svc:3000 (10.40.1.5:3000,10.40.2.8:3000)
              /database/*   visulate-4-visulate-ui-svc:80 (10.40.0.10:80,10.40.0.11:80)
Annotations:  ingress.kubernetes.io/backends:
              {"k8s-be-30180--faf3ce7920b8f0e5":"Unknown","k8s-be-32739--faf3ce7920b8f0e5":"Unknown"}
              ingress.kubernetes.io/forwarding-rule: k8s-fw-default-visulate-4-igs--faf3ce7920b8f0e5
              ingress.kubernetes.io/https-forwarding-rule: k8s-fws-default-visulate-4-igs--faf3ce7920b8f0e5
              ingress.kubernetes.io/https-target-proxy: k8s-tps-default-visulate-4-igs--faf3ce7920b8f0e5
              ingress.kubernetes.io/ssl-cert: k8s-ssl-199d19f7371bb206-24ff90a8b8b6fd94--faf3ce7920b8f0e5
              ingress.kubernetes.io/static-ip: k8s-fw-default-visulate-4-igs--faf3ce7920b8f0e5
              ingress.kubernetes.io/target-proxy: k8s-tp-default-visulate-4-igs--faf3ce7920b8f0e5
              ingress.kubernetes.io/url-map: k8s-um-default-visulate-4-igs--faf3ce7920b8f0e5
Events:
  Type    Reason  Age    From                     Message
  ----    ------  ----   ----                     -------
  Normal  ADD     10m    loadbalancer-controller  default/visulate-4-igs
  Normal  CREATE  9m35s  loadbalancer-controller  ip: 34.120.178.240
The instance is ready when the ingress.kubernetes.io/backends annotations are “HEALTHY”:
Annotations:  `ingress.kubernetes.io/backends`: { "k8s-be-30180--faf3ce7920b8f0e5":"HEALTHY",
                                                  "k8s-be-32739--faf3ce7920b8f0e5":"HEALTHY"}
This shouldn’t take more than 20 minutes.
Next Steps
Verify the instance
Use the following command to get the IP address for the instance:
SERVICE_IP=$(kubectl get ingress $APP_INSTANCE_NAME-igs \
  --namespace $NAMESPACE \
  --output jsonpath='{.status.loadBalancer.ingress[0].ip}')

echo "http://${SERVICE_IP}/"
Follow the verification steps in the quickstart guide to verify the application is working correctly.
Database registration
Identify the databases you want to document and follow the steps in the database setup guide to create a Visulate account in each one. Create a database registration file and apply it to the cluster by following the instructions in the database registration guide.
Tip: the troubleshooting guide includes instructions for how to diagnose and rectify failed connections.
Configure the SQL Query Engine
Follow the steps in the Query Engine configuration guide.
Update the TLS certificate
The TLS certification guide describes how to update the TLS certificate.
Cleanup
You can use the generated manifest to delete the instance when it is no longer required:
kubectl delete -f "${APP_INSTANCE_NAME}_manifest.yaml" --namespace "${NAMESPACE}"
You should also:
- Delete the GKE Cluster if it is no longer required.
- Drop the visulate user from each database. Login to SQL*Plus as SYSTEM and run
drop user visulate cascade; - Verify the Load balancer that was created to support the Ingress resource has been removed. See the troubleshooting guide for details.
Copyright © Visulate LLC, 2019, 2025 Privacy Policy